All My Friends are Flowers

garden inspiration and design

  • About
  • Landscape Design Portfolio
  • Plant Index
  • Here’s How
  • Life + Baby
  • Free Landscape Designs + Graphics
  • Living in Europe

Denim Whale Tutorial & Printable Pattern

December 31, 2013 by Lacey

Whales-on-Books-for-final-blog-post

*****UPDATE**** If you’d like an adorable denim whale but aren’t up for making it yourself, you can buy one from my shop here**************************************************

I don’t claim to be a seamstress, in fact my sewing skills are novice at best.  But when I stumbled upon a denim whale on Pinterest the other day I couldn’t help but make a denim whale for my baby girls nursery.

The inspiration came from a whale I pinned off of this Finnish blog.  The pictures were great, but she didn’t give a pattern.  In fact she noted in her post that she draws her own pattern right on the fabric.  That wasn’t going to work for me.  I love to draw, but I also love to erase and redraw until I’ve got something just the way I like it.  The idea of erasing on denim didn’t really appeal to me.

So I drew my pattern out on notebook paper {which you can see pictured in my tutorial}  and made a few changes.  I wanted my whale to be a little more friendly, so a gave him some cartoon-ish features and made his lest anatomically correct.

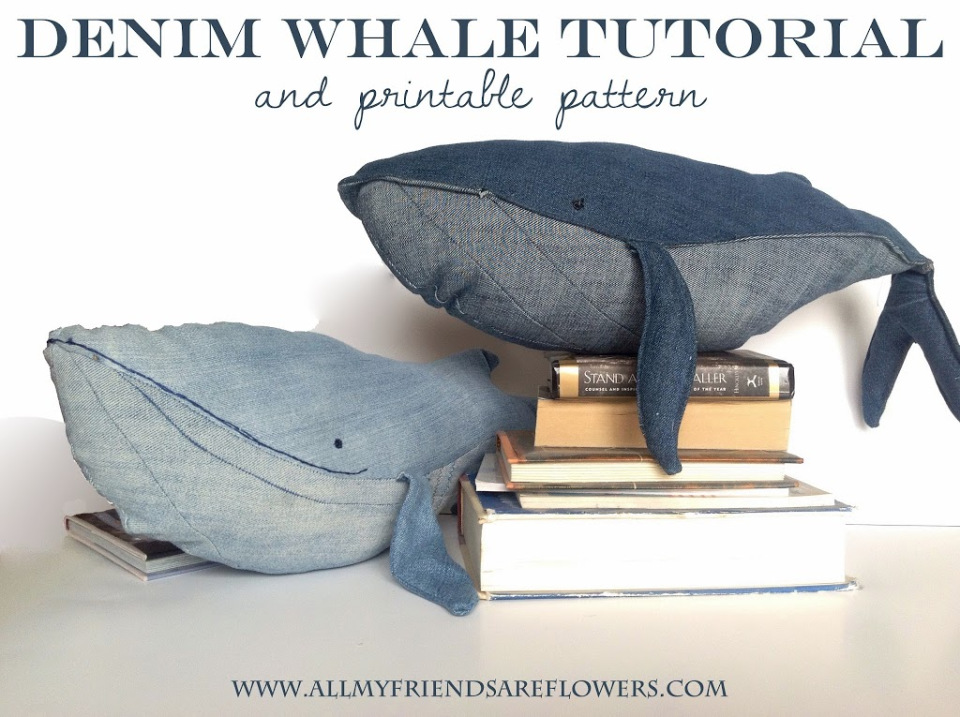
The pattern isn’t perfect, not by a long shot. But I’ve used it to make two whales so far and it’s worked great for me.  The following tutorial is of the second whale I made, the dark blue guy pictured above.  I did a few variations at my little brother’s request and I ended up loving the changes.

My second whale has topstitched fins that we filled with fluff.  The first whale has floppy fins and tail, which I think suits him just fine.  Also, on the second go around I topstitched where the belly attaches to the top of the body.  This gave him a very distinguished, whale-like upper lip which I liked better than the embroidered smile I gave the light blue whale.

Remember, my pattern is free.  Feel free to use it to make whales for yourself, to give away, or go ahead and use it to make whales to sell.  However, please do not claim the pattern itself as your own or sell it in any way.  Also, if you repost this idea on your own blog please link it back to my blog and the original pattern.  Enjoy!


The All My Friends are Flowers Denim Whale Tutorial
First, download the pattern HERE.
It’s five separate PNG files that should print on standard 8″ x 11.5″ printer paper.  Because it’s printer friendly some taping of the pieces is required. Instructions are given on each sheet describing how they should be put together.
Next, find an old pair of jeans that you don’t mind cutting apart.  I’m a little sentimental about jeans.  My favorite pair bit the dust this summer when the butt tore wide open on a hike where I was chaperoning a bunch of my high school students.  Yeah, it was bad.  They’d been sitting in my drawer since August because I couldn’t bear to part  with them.  Well now I don’t have to! They were washed and turned into a stuffed animal for my soon-to-be-born baby girl.

Filed Under: Here's How, Life + Baby, Slider

How to Grow Dahlias

May 19, 2013 by Lacey Leave a Comment

Its been a while.  Between attending night classes to get my teaching license and trying to wrap up my first year teaching high school its been a little bit hectic.  But school is out in a week and a half so there are no more excuses.

I’m going to write about something I’ve been meaning to write since last summer: Dahlias.  I had a childhood friend whose mother grew fantastic dahlias under their bay window.  The blossoms ranged in color from bright pink to fiery orange.  Some blooms were small, others spanned about eight inches across. Time passed and I had mostly forgotten about this vibrant, flowering tuber until a trip to the Madrid Botanical Gardens.

… 

Read More »

Filed Under: Annuals, Here's How

How to Take Care of Your Air Plant- Tillandsia

March 20, 2013 by Lacey Leave a Comment

All through high school and into college I worked at a beautiful garden center.  The owner’s sister managed the greenhouse.  I spent countless hours learning how to properly water hydrangeas, and trim angel vine topiaries.  Upon return from a buying trip in California, she brought me an air plant and a 100 year old chunk of grape wood to display it on.  Sadly, my air plant wasn’t long lived.  Because it requires so little care, air plants can be easily forgotten. The waterings were so infrequent that I missed them all together, and it was up on an obscure shelf where the air plant easily went unnoticed.

Fast forward to last weekend.  I got my hands on a beautiful piece of cholla cactus with the idea of decorating my coffee table.  I thought back to Christine and my 100 year old grape wood and decided to give another air plant a try.  I drove up to Cactus and Tropicals, a nursery that specializes in houseplants, to purchase the perfect Tillandsia.  With the hopes of keeping this air plant alive, I’ve researched Tillandsia and its care requirements.

So… air plants or Tillandsia grow the best in humid environments.  Now my apartment in Orem, UT is anything but humid. The good news is that humidity can be falsified.  By lightly misting the air plant once or twice a week, or soaking it in a bowl of water every two weeks, the plant can survive in drier climates.

Tillandsias prefer bright, filtered light.  Direct light from window sills are is a definite no.  Instead try place your plant a few feet away from a bright window.

Because air plants survive without soil, they can be attached to pretty much anything.  Branches of driftwood, cholla cactus, manzanita, or grape wood are great decorative options.  You can also use sea shells, rock, or glass terrariums.  Air plants can be mounted using a non water soluble glue or silicone caulk.

Filed Under: Annuals, Here's How, Houseplants

The Resurrection Fern

January 24, 2013 by Lacey Leave a Comment

I love houseplants in the winter.  There’s something about greenery indoors in the middle of a bleak January that eases my cabin feaver.  Many housplants {especially ferns} help purify and clean the indoor air.  Clean air is hard to come by this week due to the Utah Valley inversion.  When I look out my window at the hazy smog I feel some comfort in the fact that I have a few housplants working to rid my air of the toxins creeping in from outside. Yes, I love housplants in the winter, but my love for housplants is seasonal.

I can’t stand having houseplants in the summer. When the garden is producing delicious leafy things, when the perennials are in full blossom, and the patio containers have verbena trickling down their sides I have little tolerance for indoor plants.  This might seem ungrateful, considering all they did for me over the winter, but its the turth.  My plants indoors can feel neglected since I’m spending most my time outside deadheading and fertilizing.  So I usually gather up all my housplants and move them to the shadier parts of my yard. The lucky survivors of a few cool september nights have the luxury of being invited back in for the winter {providing they bring no insects or pests with them}.

There is another solution for my seasonal need for indoor green.  How about a plant you can kill near the end of March when the tulips begin to bloom and revive in October when you’ve trimmed your last perennial to the ground.  Impossible you say?  Let me introduce you to the resurrection fern.

This fern, native to the southeastern United States and Africa, is a remarkable little plant.  Its name is derived from its ability to survive very long periods of drought.  This fern is an epiphyte or an air plant, which means it gets nutrients and water from the air.  You can set them in a dish of water and within minutes they’ll start to open their fronds and turn green.  A constant supply of water will keep them happy and thriving.  As their water supply dries out they begin to curl and turn brown once again. 

I like to keep mine on my coffee table.  There’s no conversation piece like a plant that cant be killed.  During the summer months I store it carfully in a dry, dark place and bring it out agian in winter for some air-purifying greenery.

I found mine at a local specialty nursery, Cactus and Tropicals in Salt Lake City, but you can also order them online.  You can also find them on Amazon sold in different sizes and varieties. 

Filed Under: Here's How, Houseplants, Uncategorized

How-to: Wooden Fall Pumpkins

October 4, 2012 by Lacey Leave a Comment

We don’t claim to be crafty, but as promised here’s the tutorial from yesterday’s post…

Wooden Fall Pumpkins

Fall Crafts, Wooden Pumpkins, Pumpkin Crafts

When we say we don’t “claim to be crafty” we mean that we had to laugh out loud when we made a “materials” list.  The fact that we even own a small pair of pliers actually makes us a bit giddy.  Now, we will confess that we have hopes of being crafty, so why not start with old wood you can find along the roadside? And let’s face it, spray painting is a basic human gift right? (duct taping your shoes back together also qualifies as a basic human gift 🙂
These pumpkins are a super easy way to bring a little fall into your home.  We’re using them everywhere.  Bigger sets are great for front porches {paired with hay bales & dried corn stalks}or try smaller sets in your living room. 

Fall Crafts, Wooden Pumpkins
Materials (Laughing)
  • old wood + smaller branches for the pumpkin stems
    • we used log rounds & 2×2’s
  • sandpaper
  • orange spray paint
  • needle nose pliers
  • florist wire
  • wood glue

We decided to make a set of 3 pumpkins with a large, medium & small.  We measured ours so that the smallest was 1/3 the size of the largest and the medium double the size of the smallest.   Of course you can cut these by hand (argh) or you can find a neighbor with a nice big saw and trade cookies for cuts.

Fall Crafts

After the pieces are cut, sand down all surfaces.  This removes most of the dirt from these old pieces of wood and smooths the surface for painting.  For our square pumpkins, we sanded down all  sharp edges as well as the corners a bit to give the wood a more rustic feel. This step also serves as a bit of an outline for the  pumpkins, giving them dimension.  Using an electric sander speeds things along, but regular sandpaper works just fine too… after all there are only so many plates of cookies to go around.

Fall Crafts, Wooden Pumpkins

Spray paint the wood pieces on a sheet of newspaper.  Remember to spray at a steady pace to avoid drips.  The pumpkins might need one or two coats.  Try to avoid a windy day or at least avoid spraying near other things that you do NOT want to be orange.

Fall Crafts, Wooden Pumpkins

While the pumpkins are drying, make some curly-q pumpkin vines using  pliers and the florist wire. Twisting the wire around a dowel or pencil makes for nice, tight, circular curls.  Make sure to leave enough wire at the end so that it can be wrapped around the stem securely. (note the black paint on Lacey’s thumb?  That is a clue that we tried a little something with black paint and we were craftily unsuccessful)

Using wood glue, attach a small branch to the top of the pumpkin.  Be patient, the glue takes a few hours to dry completely.  (for those of you who are slightly impatient go ahead and warm up the hot glue)  After the stem is glued to the pumpkin and has dried completely, don’t be afraid to go over the edges and corners with a sander to expose the wood below.  This will give the pumpkins a more rustic/antiquey feel.  Attach your wire vines and voila–cute fall craft accomplished!

Pumpkin Crafts, Fall, Wooden Pumpkins
You just can’t go wrong with old wood and spray paint.  Didn’t they turn out cute!  Your turn.

Filed Under: Here's How, Uncategorized

How-To Floral Rings

September 24, 2012 by Lacey Leave a Comment

I teach high school. Its truly a fantastic set up.  Honestly, with my landscaping degree completed last April I never imagined myself in a classroom ever again.  But while in Spain this summer I saw an opening for floral design and couldn’t resist.  So now I’m teaching every other day and free lance designing the rest of the time.  High schoolers can be interesting, there’s no denying that. 
The design activity we did today was so cute, I just couldnt help sharing.  We made floral rings with button mums.  Since mums are in season now that we’re in chilly September, grab a few from your garden and make a ring.  They’ll keep for a day or two, especially if you refrigerate them when they arent being worn. 
You’ll need:
  • 1 foot or so of thick colored bullion wire + 2 feet of a smaller gauge wire for the              decorative base
  • jewelry tools (small wire cutters & needle nose pliers) 
  • a wooden dowel about the size of your finger
  • floral pins
  • button mums 
  • Oasis floral adhesive

 1) twist the end of the thick bullion wire into a spiral

 2) Wrap the wire around a wooden dowel the size of your finger two or three times depending on your desired thickness.

 3) Bring the wire back up to the top and twist the loose end into a spiral.

4) Take the thinner wire, and wrap it around two fingers so that it makes a loose oval.

 5) Pinch the center of the oval, and wrap the tail of the wire around the center once or twice to secure.  Fan out the loops on either side into a flower shape.

6) Attach the wire flowers to the ring using the tail wrapped around the center, making sure to keep the center as compact as possible. 

 7) Use Oasis Floral Adhesive to attach the button mum to the center of the wire flowers.

Filed Under: Floral Design, Here's How, Projects

Making Your Own Topiary

August 13, 2012 by Lacey 1 Comment

Summer is in the early stages of its farewell.  As gardens are offering their full bounty, pumpkins and gourds fatten on their vines, and summer blooms begin to fade.  This is the time of year, after a summer full of coneflowers, daisies, and zinnias, that I ponder on how to add interest to a landscape that can become barren and stark in winter months.  I drew inspiration from my summer in Europe, and specifically a wonderful day trip to the palace of Versailles, just outside of Paris.      


Evergreens add year round structure to your landscape, and if implemented in a topiary form, will add additional interest. Topiaries can be purchased at any garden center, usually in varying sizes and shapes.  As topiaries are more costly than their un-sculpted counterparts, creating your own can be extremely cost effective as well as fun.  


1.  Choose Your Plant
Its easy to start your topiary with a juvenile shrub.  These are more simple because a smaller shrub can be molded as it grows.  However a topiary can be accomplished with a grown & established plant as well.  
If you have chosen to topiary a new shrub you might want to check out a topiary form.  Wire forms can be purchased in a variety of shapes, everything from swans to giraffes, giving you the option for many unique topiaried forms to add interest in your garden.  Although it might take a season or two for the plant to fill in the form, you will have a guide to fallow when pruning which makes keeping the shape much easier.  
If your plant is established, adding a form might be difficult.  Instead begin by clipping your shrub into a rough outline, then create your own guide out of thick wire.  Topiary spirals, cones, and balls can easily be sculpted this way.
2. Training 
The first thing to remember when it comes to homemade topiaries is that its a process, a slow {but gratifying} process.  
Remember that when working with a growing shrub, no more than one inch should be pruned off in areas that need to be filled in.  This pruning will encourage additional bushy growth.  
For larger, more established shrubs three inches is the limit.  More pruning than this will cause die back, and will ruin the topiary.  By only taking three inches at a time, your sculpture will begin to take shape, and you wont have to worry about any burnt-looking, dry areas.  
3. More Training & Pruning
Topiaries are never “finished”.  A growing sculpture needs constant upkeep.  If you have a finished product, or are still working on the training and shaping part, its the same: prune every 3 months. 
   

Filed Under: Design Tips, Evergreens, Here's How, Trees

Plant of the Week- Espalier Fruit Trees

August 7, 2012 by Lacey Leave a Comment

Are you jealous of all your friends’ delicious fruit harvests?  Would you love a peach, apple, pear, apricot, or plum in your yard, but don’t think you have the space?  Why not try one of my favorites, espalier fruit trees.
With horizontal branches, these trees can be planted up against walls or fences {providing they still get some good direct sunlight} and provide maximum delight with minimal space.  Although you can prune and train your own young fruit tree, many espalier fruit trees are available at your local nursery, all shaped and ready to go.  Many of these espaliered trees have multiple varieties grafted on to one tree.  Six espalier branches = six different varieties!
Keep your tree growing in the right direction with the assistance of some stakes and heavy 
gauge wire.  Be sure to prune off any rogue shoots in early spring, the perfect job 
for a pair of Felco pruners.

Filed Under: Here's How, Trees

Moorish Style. . .put Moor into your garden

June 21, 2012 by Lacey Leave a Comment

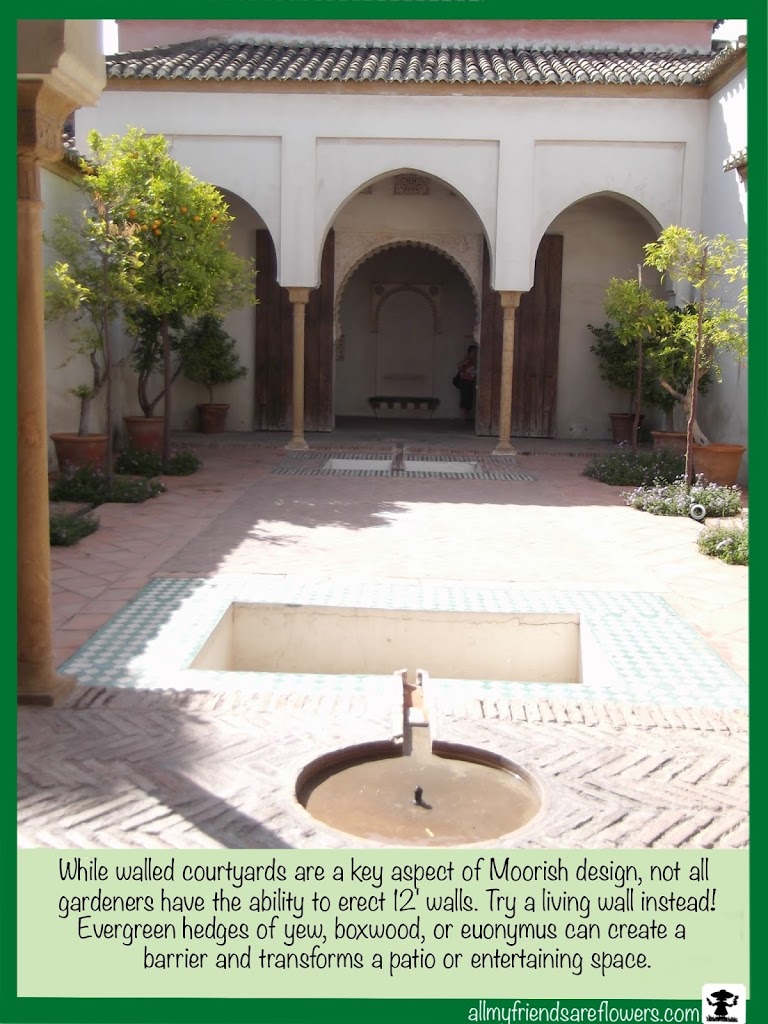
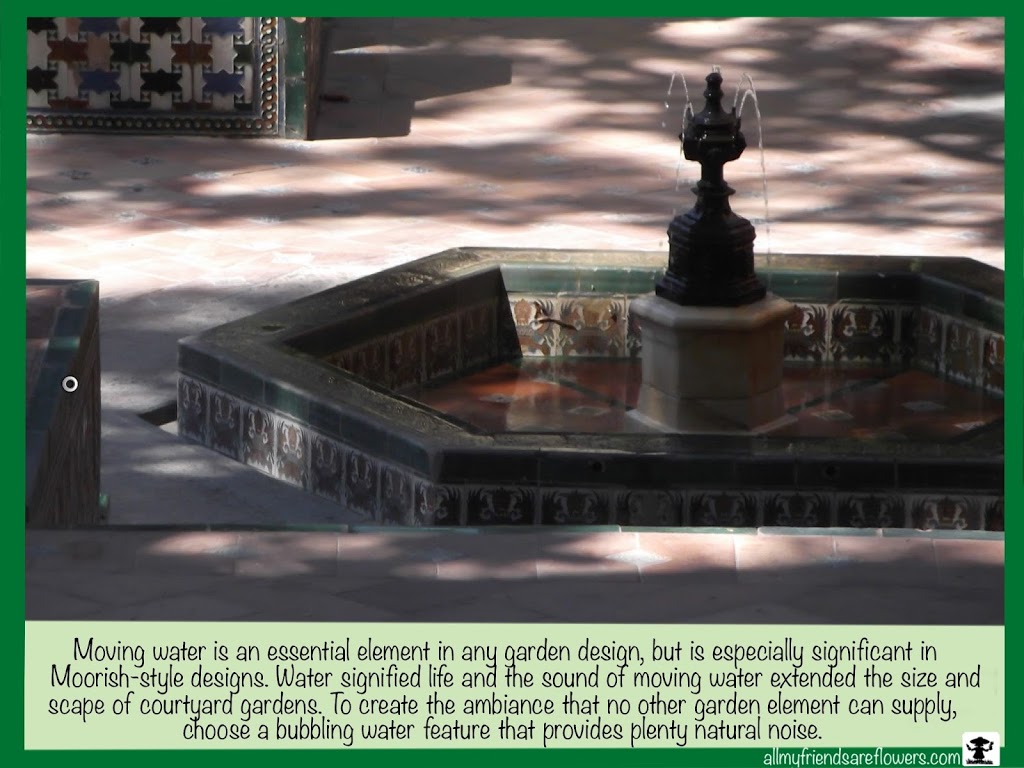
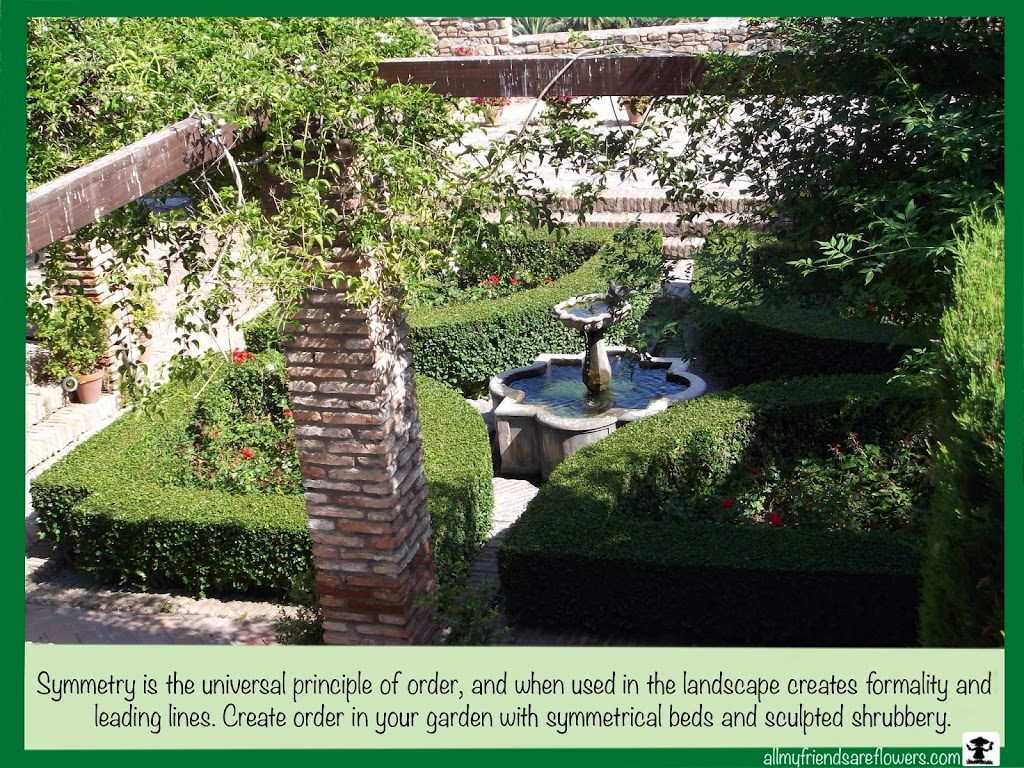
I spent this past weekend traveling to Seville and Málaga. My husband and I visited the palace of Alcázar and the Alcazaba fortress. We srtolled through the high walled courtyards, listened to the trickling water in fountains and pools, inhaled the heavy purfume of jasmine, roses and orange blossoms while admiring the contrast between terra cotta pavers and brightly colored ceramic tiles.

In the eighth century the Moorish invasion of Spain introduced a style of garden design that would remain long after their rule had ended. Islamic and Persian gardens where among the first pleasure gardens in the world, creating a fragrant refuge from the desert. These gardens were very much like our own gardens today;  places of sanctuary and escape.

It could be fun to incorporate elements of Moorish style into your garden, Here’s how!

Moorish Gardens
Moorish Gardens

Filed Under: Design Tips, European Gardens, Here's How

Double the Delphiniums

June 19, 2012 by Lacey 1 Comment

Gorgeous spires of blossoms in pinks, purples, blues, and whites emerge in early summer bringing butterflies and hummingbirds with them. To encourage a repeat performance it’s essential to remove spent blossoms. Here’s how to to bring back your blossoms.

garden delphiniums

Remember to wear gloves when handling delphiniums since they contain alkaloids that can cause skin irritation. We absolutely love Atlas nitrile gloves. They are super slim, and perfect for light pruning. Plus they come in a bunch of fun colors!

garden gloves allmyfriendsphotography

Once blooms have faded, grab you Felco pruners and trim stalks about 3″ from the ground. Remove any damaged or yellowing leaves as well. To kick start a second round of color, apply a water soluble fertilizer weekly. Enjoy double the delphiniums!

Filed Under: Here's How, Perennials

  • « Previous Page
  • 1
  • 2
  • 3
  • Next Page »

Shop Now

DIY Plush Play Veggies + Printable Transfers

DIY Plush Play Veggies + Printable Transfers

Good Reads

Get AllMyFriendsareFlowers via Email

Enter your email address to subscribe!

How to Divide Ferns

How to Divide Ferns

Succulent Container Gardens at Disneyland

Succulent Container Gardens at Disneyland

All My Friends are Flowers

All My Friends are Flowers

Hello there, I'm Lacey.

Printable Denim Whale Pattern

Printable Denim Whale Pattern

Lets Be Social

  • Pinterest
  • Annuals
  • Bulbs
  • Container Gardening
  • Evergreens
  • Floral Design
  • Free Landscape Designs + Graphics
  • Grass: Ornamental & Otherwise
  • Herbs
  • Here’s How
  • Housplants
  • I’m Inspired
  • In My House
  • Life + Baby
  • Living in Europe
  • Perennials
  • Plant Index
  • Propagation
  • Shrubbery
  • Travel
  • Trees
  • Vegetables
  • Landscape Design Portfolio

Archives

How To: Mason Jar Terrarium

How To: Mason Jar Terrarium

Welcome to All My Friends are Flowers

I’m Writing About……

adding texture to landscapes Alpine Loop autumn fern autumn stonecrop balcony gardening Best Garden Magazines burning bush design container gardening on balcony Dividing Ferns Dividng Perennials downloadable chalkboard graphics early spring annuals fall chalkboard fall graphics fall landscape design Fall Landscape Inspiration ferns free chalkboard graphics free landscape design french country landscape design full landscape design ghost fern growing bougainvilla growing paperwhites hyacinth bulbs invasive bulbs Lady Fern landscape design plan landscape design portfolio Landscape Designs male fern nursery printable ornamental grass landscape design osaka white ornamental kale ostrich fern paperwhites pea nursery decor PNG chalkboard graphics Residential Evergreen Trees residential landscape design shade garden shade perennials The English Garden Magazine Uintah National Forest utah landscape design

Copyright © 2017 · Foodie Theme by Shay Bocks · Built on the Genesis Framework · Powered by WordPress